

What is glulam paneling?
Holmen's glulam panels are made from high-quality late-grown timber from the forests of northern Sweden. With predominantly standing growth rings and a low moisture content from the time of delivery, glulam panels have a long service life and are dimensionally stable even in varying weather conditions.
Untreated glulam panel
Holmen's untreated glulam panelling is an excellent option for those who do not mind giving the panel the right surface treatment themselves. Just follow the instructions for surface treatment and make sure that it is protected if it is stored outdoors. For example, you can use an untreated glulam panel indoors, for example as an elegant feature wall, and you can choose how to do it with the surface treatment. In fact, it's really delicious even untreated.
Treated glulam panel
Glulam panels that have been treated with a suitable protective coating have good resistance and retain their original properties for a long time, even in changing weather conditions. The length of time the panel can survive without maintenance varies depending on the climate, the location of the façade and surface treatment. If a façade has a particularly exposed position, it should affect the choice of surface coating.
Holmen has one of the country's most modern facilities for surface treatment of exterior panels. As part of our environmental work, we have minimized the use of chemical products and use an increased proportion of environmentally friendly products in our operations.
As standard, we use the Sherwin Williams paint system for priming. It can be overpainted with all commonly used house paints from manufacturers with recognized good quality, except for distemper paint. The colours are documented and the colour application is checked to ensure that it is carried out correctly.
The paint is applied with a minimum of 60 μm dry paint layer, according to the paint supplier's instructions. After installation , the panel is finished painting no later than 6–10 months after installation, according to the paint supplier's instructions.
A glulam panel that is delivered primed means less time for surface treatment. Glulam panelling treated with the right protective coating has good resistance and retains its original properties for a long time, even under changing conditions.
Certifications
Glulam panel installation
The glulam panel should be installed with two screws or nails at CC 600 mm or CC 1200 mm.
Consumption of nails or screws /m2
| Panel Dimension | CC 600 |
CC 1200 |
| 25×200 | about 20 pcs | about 10 pcs |
| 25×300 | about 14 pcs | about 7 pcs |
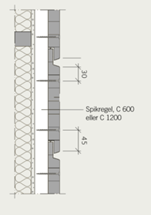
Image: Glulam panel instruction
The Glulam Handbook volume 1-4 - Swedish Wood
Execution requirements glulam panel
Outdoor wood panelling must be carried out with an aerated backing, and the air gap behind the wood panel must be at least 25 mm. Nails or screws must not penetrate the underlying windshield and narrowing in the air gap must not occur. When nailing or screwing panel boards, the fastener should be driven in perpendicular so that the head of the fastener is level with the wooden surface (see figure). When nailing or screwing with a machine, the working pressure must be set according to the minimum density of the timber. Protruding nail and screw heads must be driven in manually.
When nailing or screwing closer than 150 mm from the end of the timber, timber must be pre-drilled to avoid cracking. Panel boards without end tongue and groove must be spliced over support and with a fit. The distance between butt joints in the longitudinal direction of a board must be at least 3,000 mm. Butt joints in adjacent boards must be displaced by at least 600 mm. There is a risk that the façade can become damp and become dirty by water splashes if the panel is terminated too close to the ground surface. The distance should be at least 300 mm and the ground next to the foundation should either be made of coarse gravel or made in another way to prevent splashing.
Handling and maintenance glulam panel
A glulam panel that is handled correctly immediately after delivery and until it is installed has low maintenance costs throughout its lifetime. The wooden panel is delivered packaged in weather-protective material and for the best end result, the packaging should only be broken when it is to be assembled. If there is a long time between delivery and installation, the panel should be stored in unopened packaging, raised from the ground so as not to be exposed to moisture.
The degree of maintenance depends on the painting system, climate, façade design and colour. An annual visual inspection of the wooden façade should be carried out. Critical points such as end wood, joints, nails/screws, terminations against the ground, corners and windows are checked. Look for mechanical damage, flaking, cracking, and blistering. Damage to the surface treatment is remedied with washing, scraping, oiling and touch-up painting.